Connect to our QR Code Platform with SSO using SAML 2.0
- What is SSO?
- What is SAML 2.0?
- How the Integration works
- How to connect to our QR Code Platform using SSO
This article will guide you how to connect your users with SSO to our platform using SAML 2.0. This feature is only available for enterprise customers.
This post contains technical details for IAM Admins or your IT department managing the IDP. Please get in touch with an IT expert on your end to help you setting up the SSO connection.
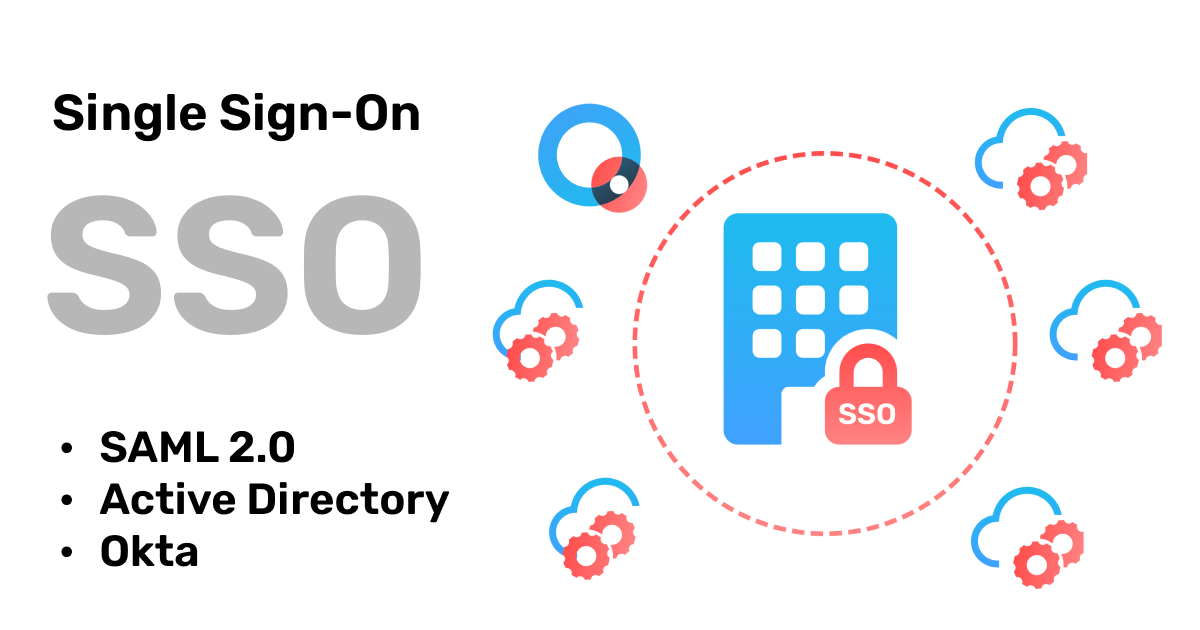
What is SSO?
SSO stands for Single Sign-On. It's an authentication process that allows a user to access multiple services, such as our QR Code platform, with one set of login credentials (such as username and password). With SSO, users don't need to remember different passwords for each application they use, streamlining the login process and enhancing security by reducing the need for multiple credentials. Once authenticated, the user can navigate between various applications or services without needing to log in again.
What is SAML 2.0?
SAML stands for Security Assertion Markup Language. It's an XML-based framework used for exchanging authentication and authorization data between parties, particularly between an identity provider (IDP) and a service provider (SP).
How the Integration works
In this SSO setup your company acts as a Identity Provider (IDP) that provides user data to us. Our White Label Platform acts as a Service Provider (SP) receiving user data and giving users access to our system.

In your IDP system you are going to add our White Label Platform as a so-called Client.
Basic information about your IDP and our SP are going to be exchanged via so-called Descriptor URLs. Behind these URLs are files that describe the IDP or SP with details for the other side to process automatically and help with the configuration.
The user information is going to be sent via a SAML 2.0 message. In this message the data is encoded in Attributes. When sending out the information from your IDP an Outbound Mapper is mapping your internal IDP fields, like first name, last name, email, etc. to SAML 2.0 Attributes.
When we receive your SAML 2.0 message our Inbound Mapper transforms the SAML 2.0 Attribute back to our internal format and we will sign in the user into our platform.
How to connect to our QR Code Platform using SSO
1. Login into your account
Head to our website and login to your white label account. Once logged in go to your Account settings and choose the SSO tab.
Login
2. Choose the SSO Type
When you sign in with a user from your company on our platform you can choose how this user can access the platform. There are 2 different scenarios possible:
- User logs in as white label user 1:1
- User can login under different white label users 1:n
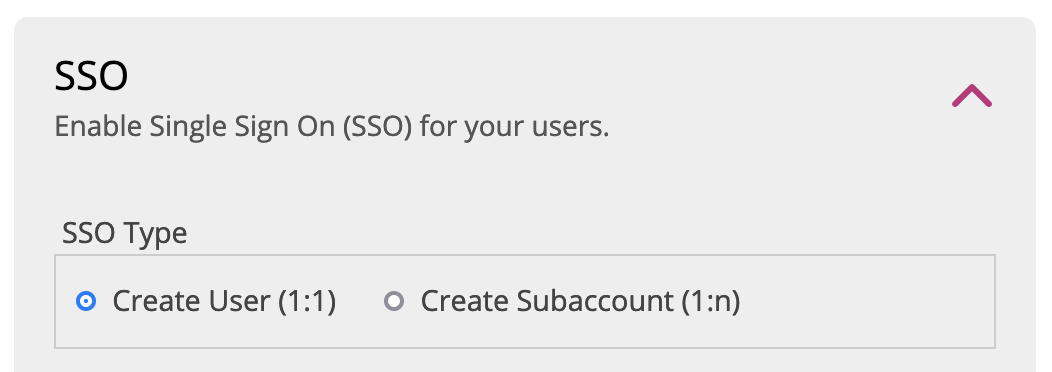
To continue with the setup of the SSO connection you must choose a SSO Type first.
For you to understand the concepts as quickly as possible we use an example during this article. Let‘s make the following assumptions:
- The users Adam, Eve and Steve work in your company and need to get access to the White Label Platform.
- You are using Okta as the Identity Provider (IDP) in your company. If you don't have Okta but a different IDP you do not need to worry. Even though the steps are not completely the same they will be quite similar.
Create User (1:1)
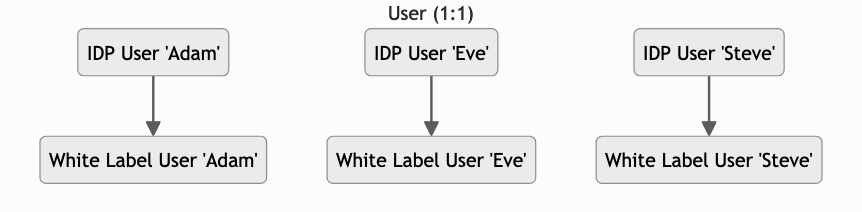
Select User if you want that a user in your Identity Provider (="IDP User") will be assigned to exactly one (1:1) individual white label user.
When an IDP User signs in for the first time, the corresponding White Label User will be created. In the example above the IDP User Adam will be created as White Label User Adam when he is logging in for the first time.
Create Subaccount (1:n)
In this scenario, let's assume as an example that the White Label platform has one user for the Marketing department and one user for the CustomerService department.
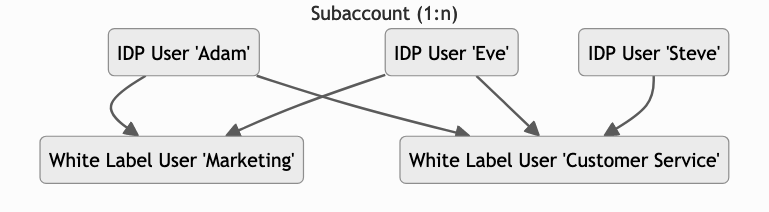
Select Subaccount if you want that a user in your Identity Provider (="IDP User") is mapped to one or more (1:n) white label users.
In the example above the IDP users Adam and Eve can use the White Label Users Marketing and CustomerService. The IDP User Steve can only use the White Label User CustomerService.
An IDP User will then act like a teamleader and he can choose under which white label user he wants to sign in. Hence Adam and Eve can choose if they want to sign in as White Label User Marketing or CustomerService
3. Enter the SAML 2.0 IDP Descriptor URL

After you have chosen the SSO Type you need to enter the SSO IDP Descriptor URL of your Identity Provider. This is needed for us to get basic information about how to connect and authenticate your users with SAML 2.0.
4. Set Identity Provider Service URLs
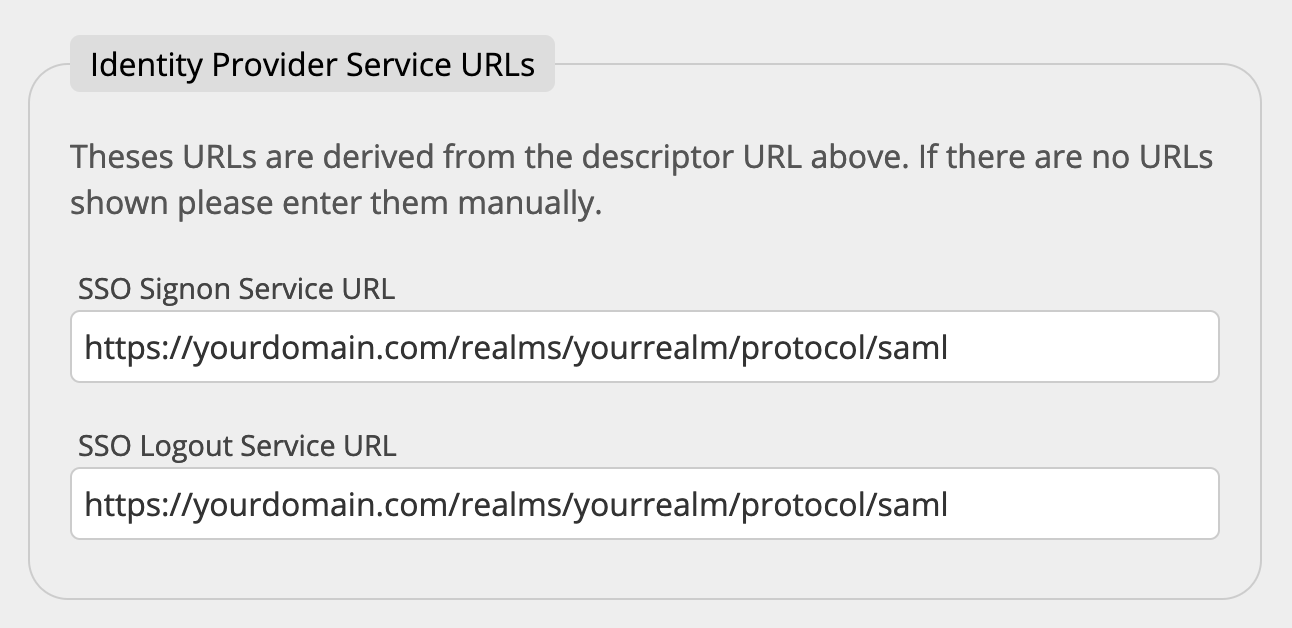
Once you have entered the SSO IDP Descriptor URL the service URLs are extracted from the Descriptor URL and the fields for the SSO Signon Service URL and the SSO Logout Service URL are pre-populated.
If there are no URLs shown, please enter them manually. The SSO Logout Service URL is optional. If the URL is set, the user will be redirected to this URL when he signs out from the QR Code platform. He can then optionally also log out from his IDP.
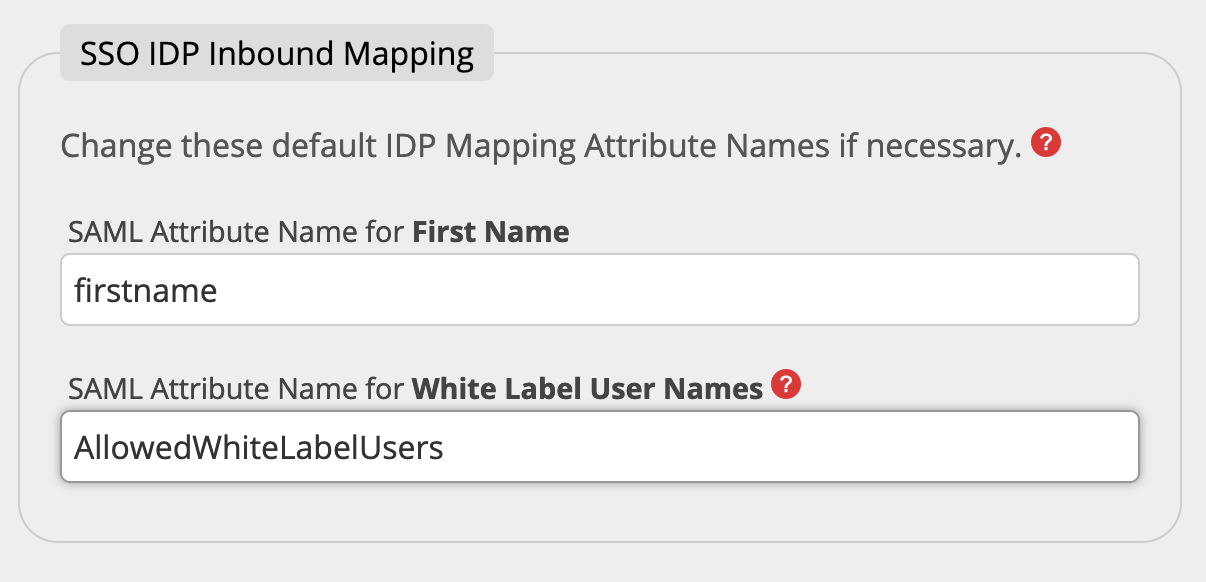
5. Check SSO IDP Inbound Mapping
After the SSO IDP Descriptor URL and the SSO Provider Service URLs are defined it is necessary to specify in what format the IDP User is transferred to us in the SAML message.
We already provide you with standard values for the Attribute Names for first name, last name, email and phone. However, please check how your IDP exports the fields (Outbound Mapping), as its maybe necessary to change these values.
Let's evaluate how the mapping works in an Okta IDP system.

As you can see in the screenshot above the IDP fields on the right side are mapped into the SAML message attribute on the left side as follows:
- first name: the IDP profile field user.firstName is sent in the SAML message as attribute firstname
- last name: the IDP profile field user.lastName is sent in the SAML message as attribute lastname
- email: the IDP profile field user.email is sent in the SAML message as attribute email
Let's compare those values with the settings in the white label portal in the SSO IDP Inbound Mapping fieldset.
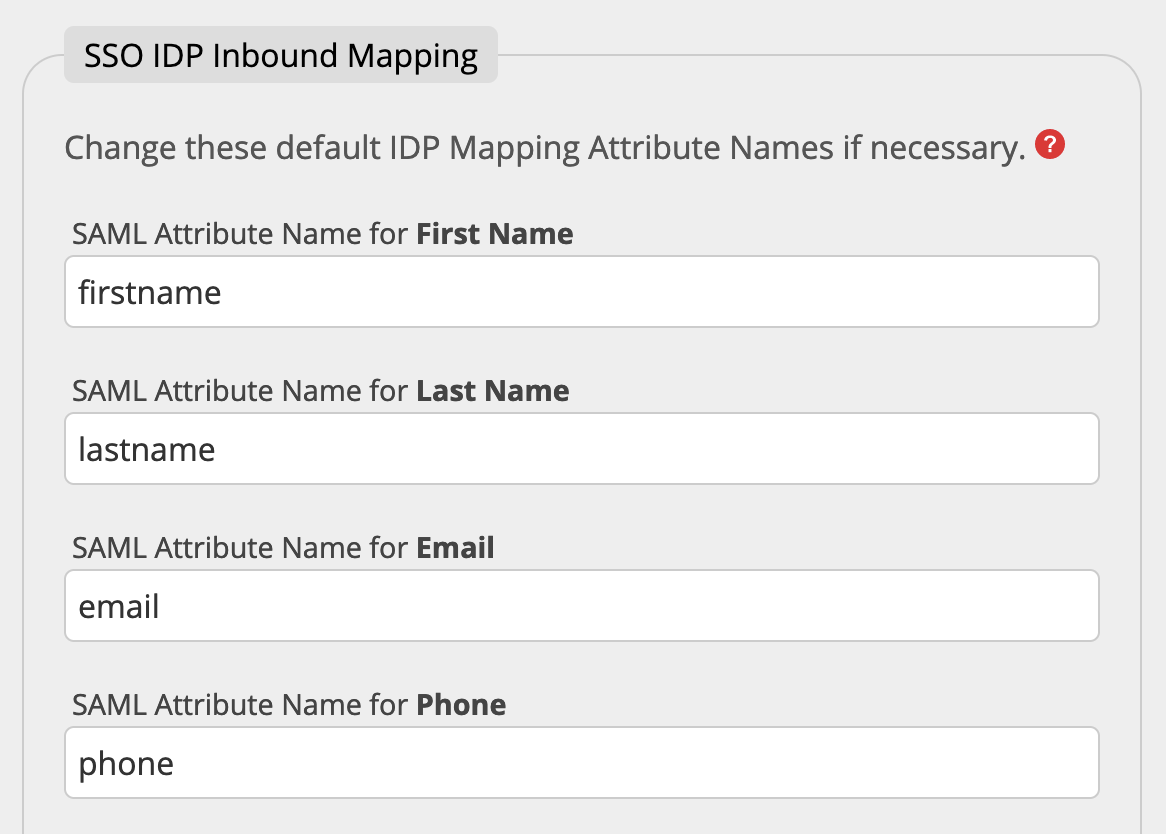
As you can see in the following comparison table all fields have the same name (firstname=firstname, lastname=lastname, email=email) and you do not need to change the attribute names in the SSO IDP Inbound Mapping area.
| I IDP profile field name | II SAML message attribute name (Outbound Mapping) | III White LabelSSO IDP Inbound Mapping |
|---|---|---|
| user.email | email | email |
| user.firstName | firstname | firstname |
| user.lastName | lastname | lastname |
If the values in column II and III are different you have to change the entry in the Portal in the SSO IDP Inbound Mapping section to the value in column II.
6. Initialize Connection
Finally, click on the Connect button at the bottom to initialize the connection to your IDP.

You then get presented the Service Provider Descriptor URL. This URL can be used by your IAM Admin/IT department to finish configuration on their side.

You can copy this URL via the copy icon on the right end of the field.
In Okta, go to Application > Your Application > General > SAML Settings > Edit and paste the Service Provider Descriptor URL in the end into Single sign-on URL and Audience URI (SP Entity ID) in the Configure SAML tab like shown in the screenshot below.
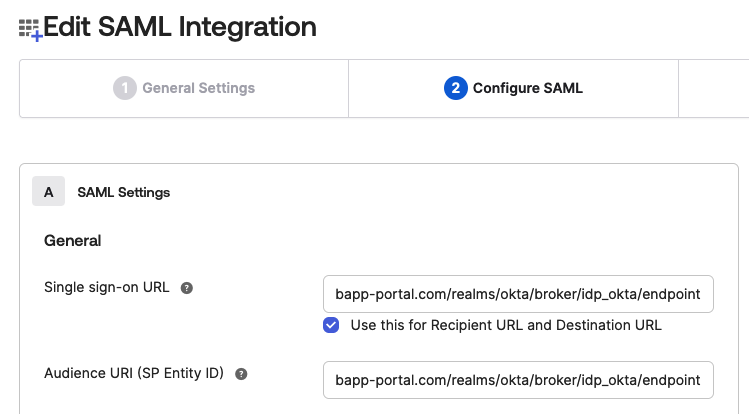
Now click on Next, and on the Finish button.
7. Test the SSO Login
Once you have setup the connection you will will see a new login button SSO Login on the login screen. Click on the button to see if the login flow works.
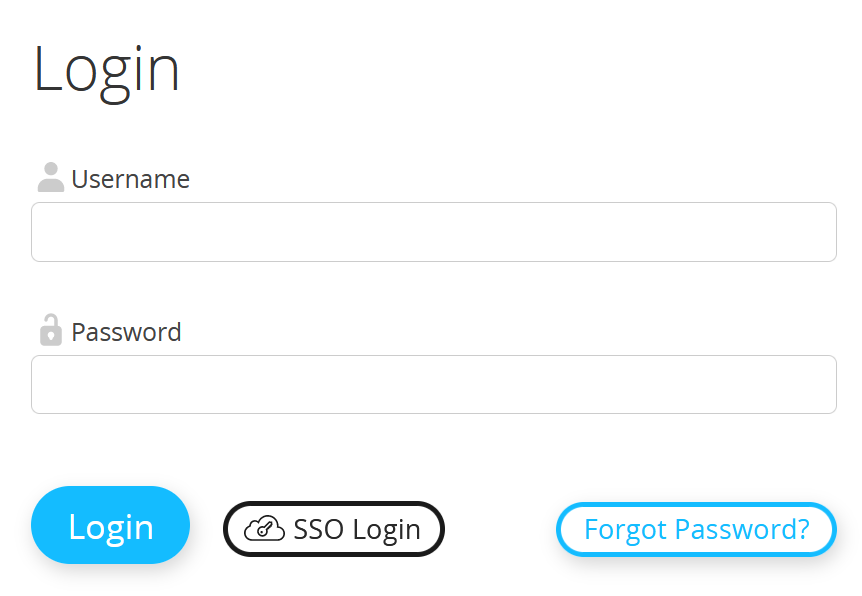
You can also bookmark the direct SSO login endpoint shown in the SSO settings at the bottom.

Mapping Roles in the Identity Provider
If you have selected the SSO type Subaccount (1:n) you need to provide the information which IDP User should have access to which White Label User.
Usually, the allowed White Label User Names are stored as one of two possible ways in the Identity Provider:
A. Storing the allowed White Label User Names as a regular Role in the IDP
In that case you create an additional Role for every White Label User. The name of the role must be identical to the White Label user name.
To follow our example from above you need to create the two roles Marketing and CustomerService.
Now assign the role Marketing to Adam, Eve and Steve. The role CustomerService is just assigned to Adam and Eve since Steve should not be able to access the user CustomerService.
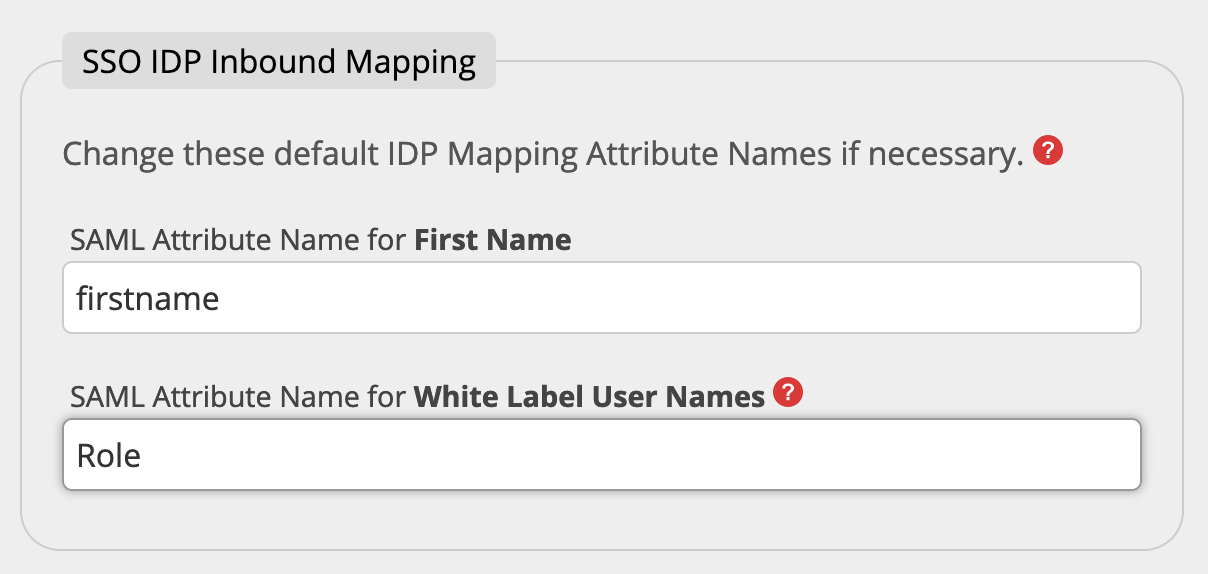
You must set the correct Attribute Name containing this information in the field White Label User Names in the SSO IDP Inbound Mappings. In this case you usually enter "Role". Depending on your IDP system or configuration the name could be different.
B. Storing the allowed White Label User Names in a custom field on the user profile in the IDP
In that case you create a custom field, e.g. AllowedWhiteLabelUsers, on the user profile in the Identity Provider.
Again, we use the IDP Okta as an example. Go to Directory > Profile Editor > User (default) and click on Add Attribute
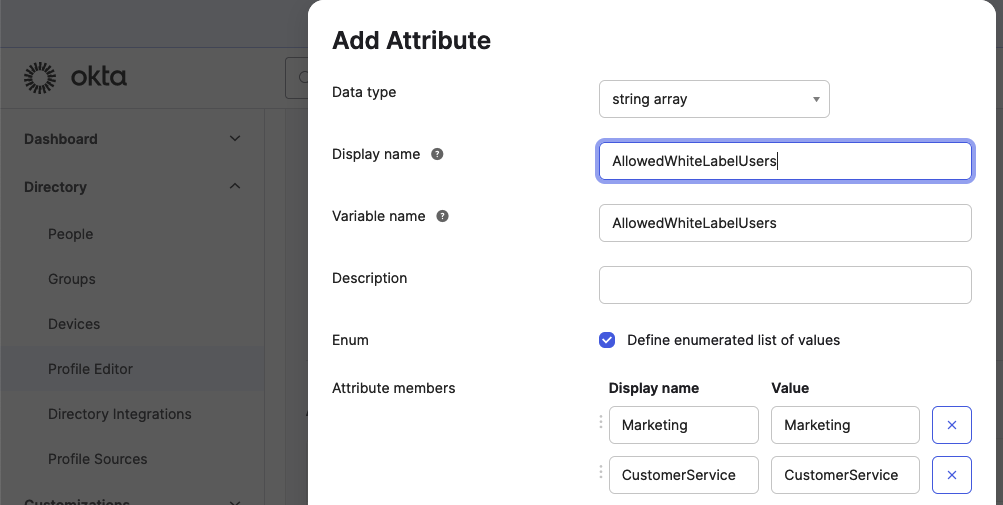
In our example this would mean that you create the possible values Marketing and CustomerService for the custom field AllowedWhiteLabelUsers.
Now choose for every IDP User that should be able to access the White Label platform the corresponding name of the White Label User from the AllowedWhiteLabelUsers dropdown.
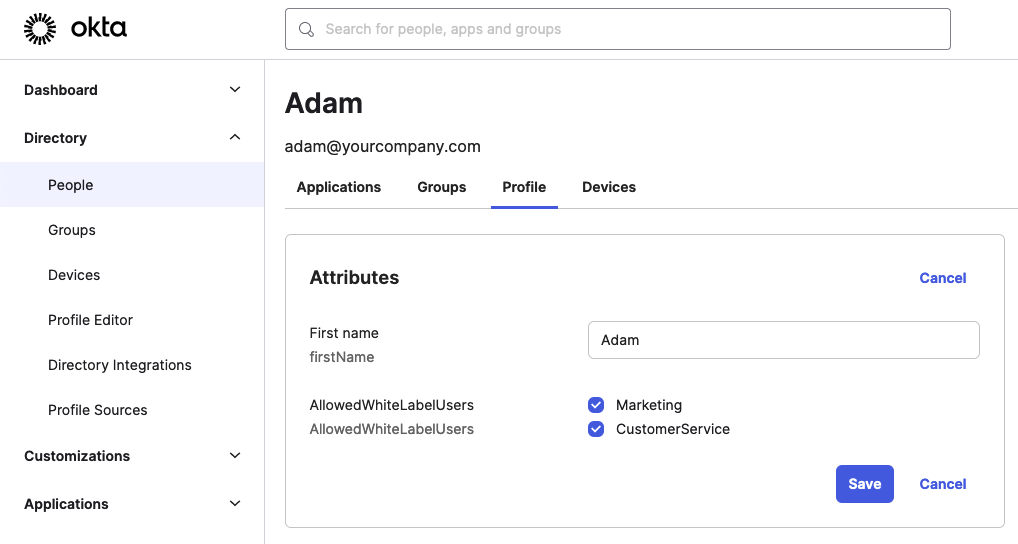
In our example we would therefore choose the values Marketing and CustomerService for the IDP Users Adam and Eve. For the IDP User Steve we would just choose the value CustomerService.
You must set the correct Attribute Name containing this information in the field White Label User Names Attribute Name in the SSO IDP Mappings.

In our example we used "AllowedWhiteLabelUsers".
Special Case: Login of Admin/Manager via SSO
Your admin user can log into our whitelabel platform directly via username and password by default. However, it is also possible to use SSO to log in as an admin or manager.
For that case there are 2 special Roles available: whitelabel_admin and whitelabel_manager.
Usually, the information if an IDP user is a whitelabel admin or whitelabel manager is stored in one of two possible ways in the Identity Provider:
A. Storing the Admin/Manager access rights as a regular Role in the IDP
In that case you create two additional Roles called whitelabel_admin and whitelabel_manager.
Now assign the role whitelabel_admin to the IDP users that should be an admin, and whitelabel_manager to the IDP users that should be a manager.

You must set the correct Attribute Name containing this information in the field White Label User Names in the SSO IDP Inbound Mappings. In this case you usually enter "Role". Depending on your IDP system or configuration the name could be different.
B. Storing the Admin/Manager access rights in a custom field on the user profile in the IDP
In that case you create a custom field, e.g. AllowedWhiteLabelUsers, on the user profile in the Identity Provider.
Again, we use the IDP Okta as an example. Go to Directory > Profile Editor > User (default) and click on Add Attribute
Special Case: if you already created the field AllowedWhiteLabelUsers because of the SSO type Subaccount (1:n) then instead just scroll down in the attribute list until you find the field AllowedWhiteLabelUsers and click on edit (pencil icon).
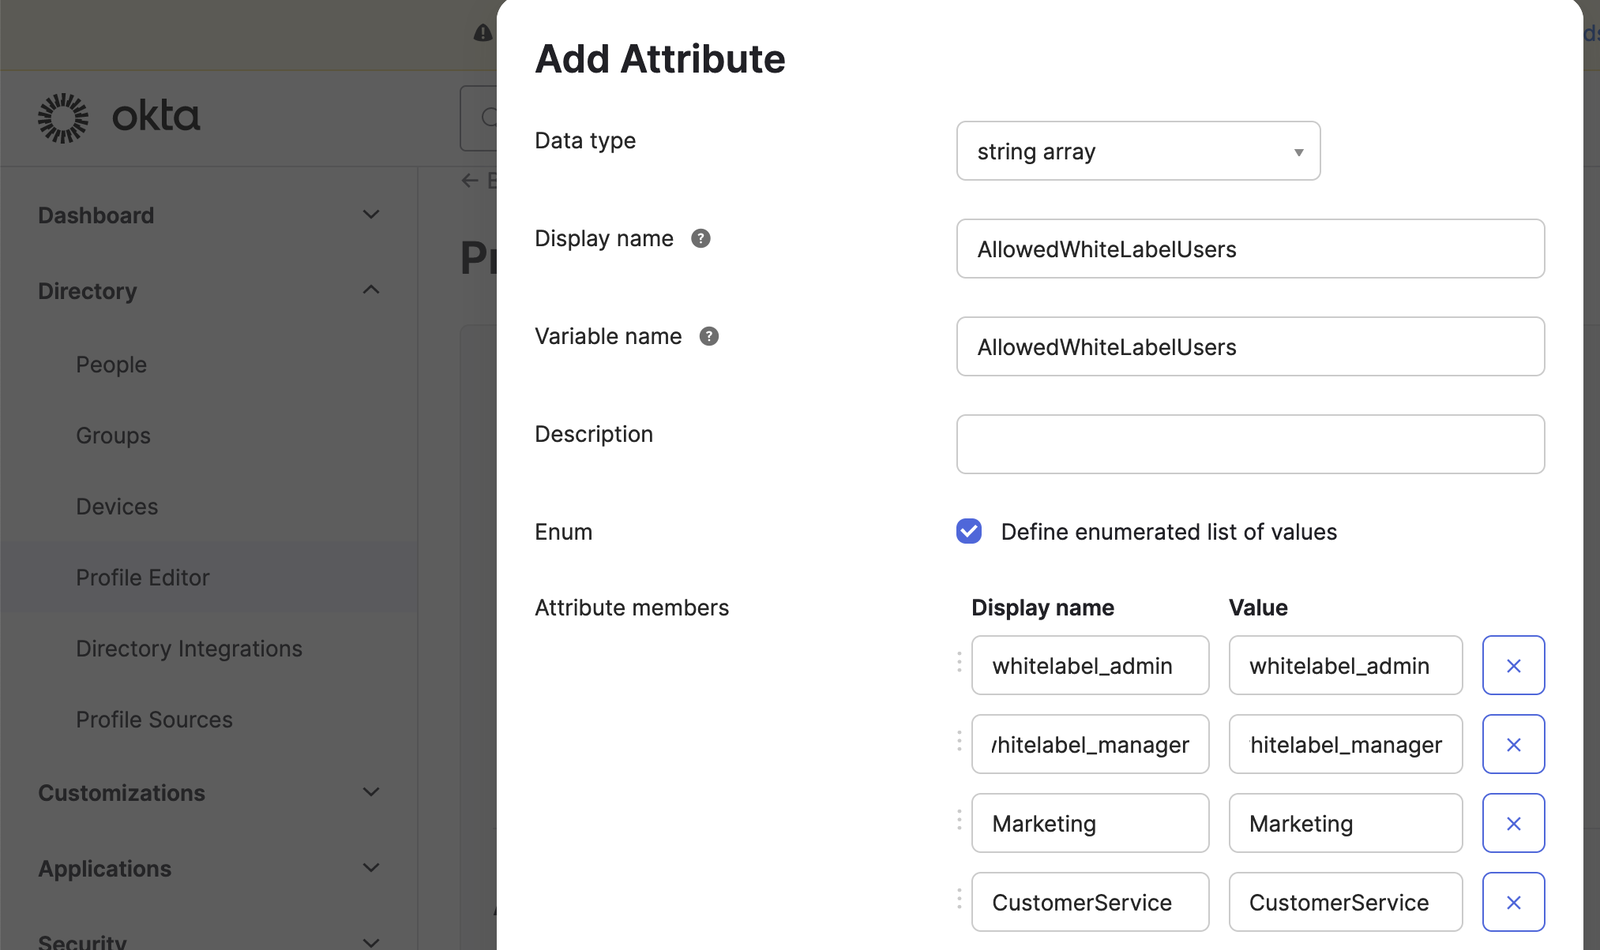
As a field type choose "dropdown", "string array", or any other type that provides a list of possible values. Enter the two possible values whitelabel_admin and whitelabel_manager.
Now choose for every IDP User that should be an admin or manager the White Label platform the corresponding value whitelabel_admin or whitelabel_manager from the AllowedWhiteLabelUsers dropdown.
In our example we would give the IDP user John the admin rights.

You must set the correct Attribute Name containing this information in the field White Label User Names Attribute Name in the SSO IDP Mappings.
In our example we used "AllowedWhiteLabelUsers".
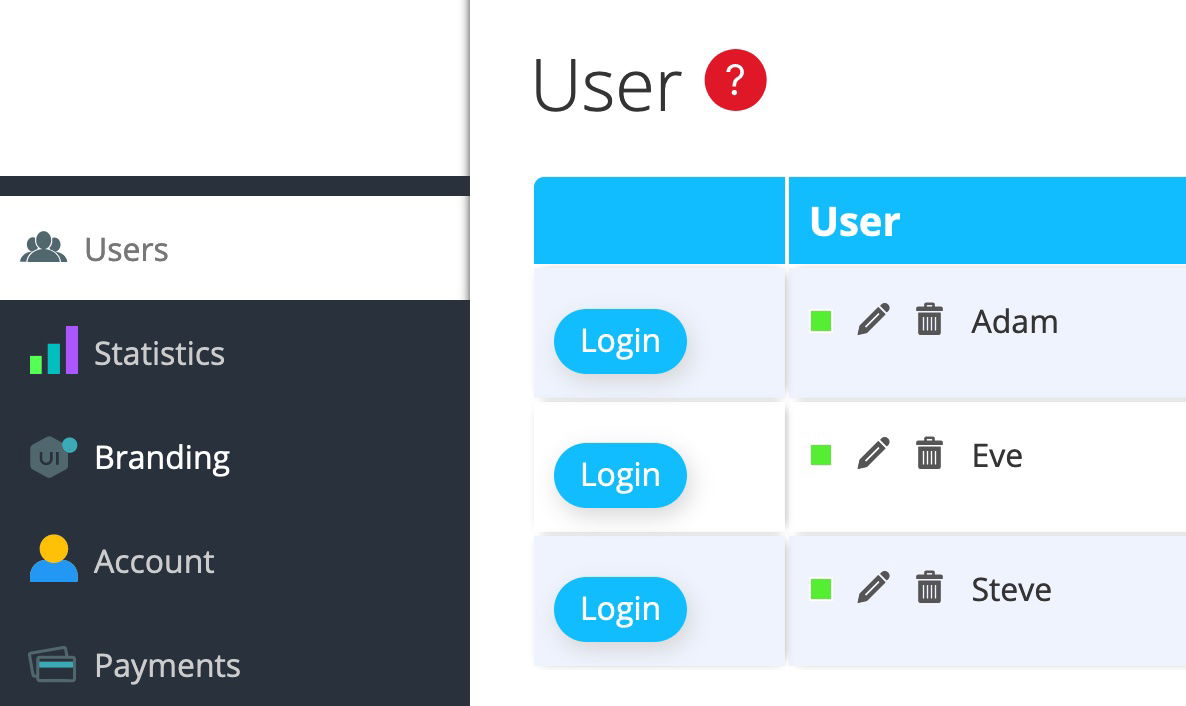
First Login of a SSO User
In this section you will see how the white label account looks like after the first login of the users for the 2 different SSO types.
SSO Type User (1:1)
When an IDP user logs in for the first time via SSO, a White Label user with the same name is created. In the example below you see the 3 IDP users Adam, Eve and Steve created as White Label users in the User section.
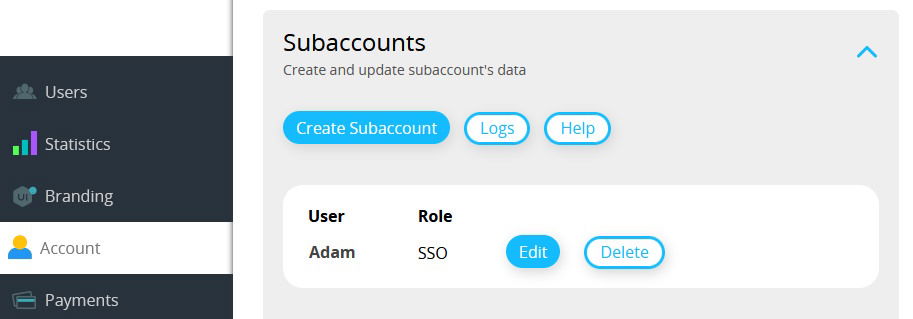
SSO Type Subaccount (1:n)
If an IDP user logs into our platform for the first time, a subaccount with the role SSO is created and the matching White Label users are assigned to that subaccount. You can see the Subaccounts in the Account section under the Subaccounts tab.
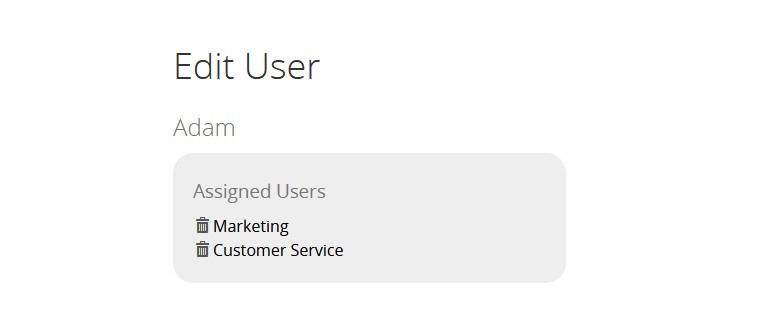
The following screenshot shows the IDP user Adam assigned to the White Label users Marketing and CustomerService.
SSO Debugging
To debug the SAML 2.0 communication between your Identity Provider (IDP) and our Service Provider (SP) you can install the browser plugin SAML-tracer.
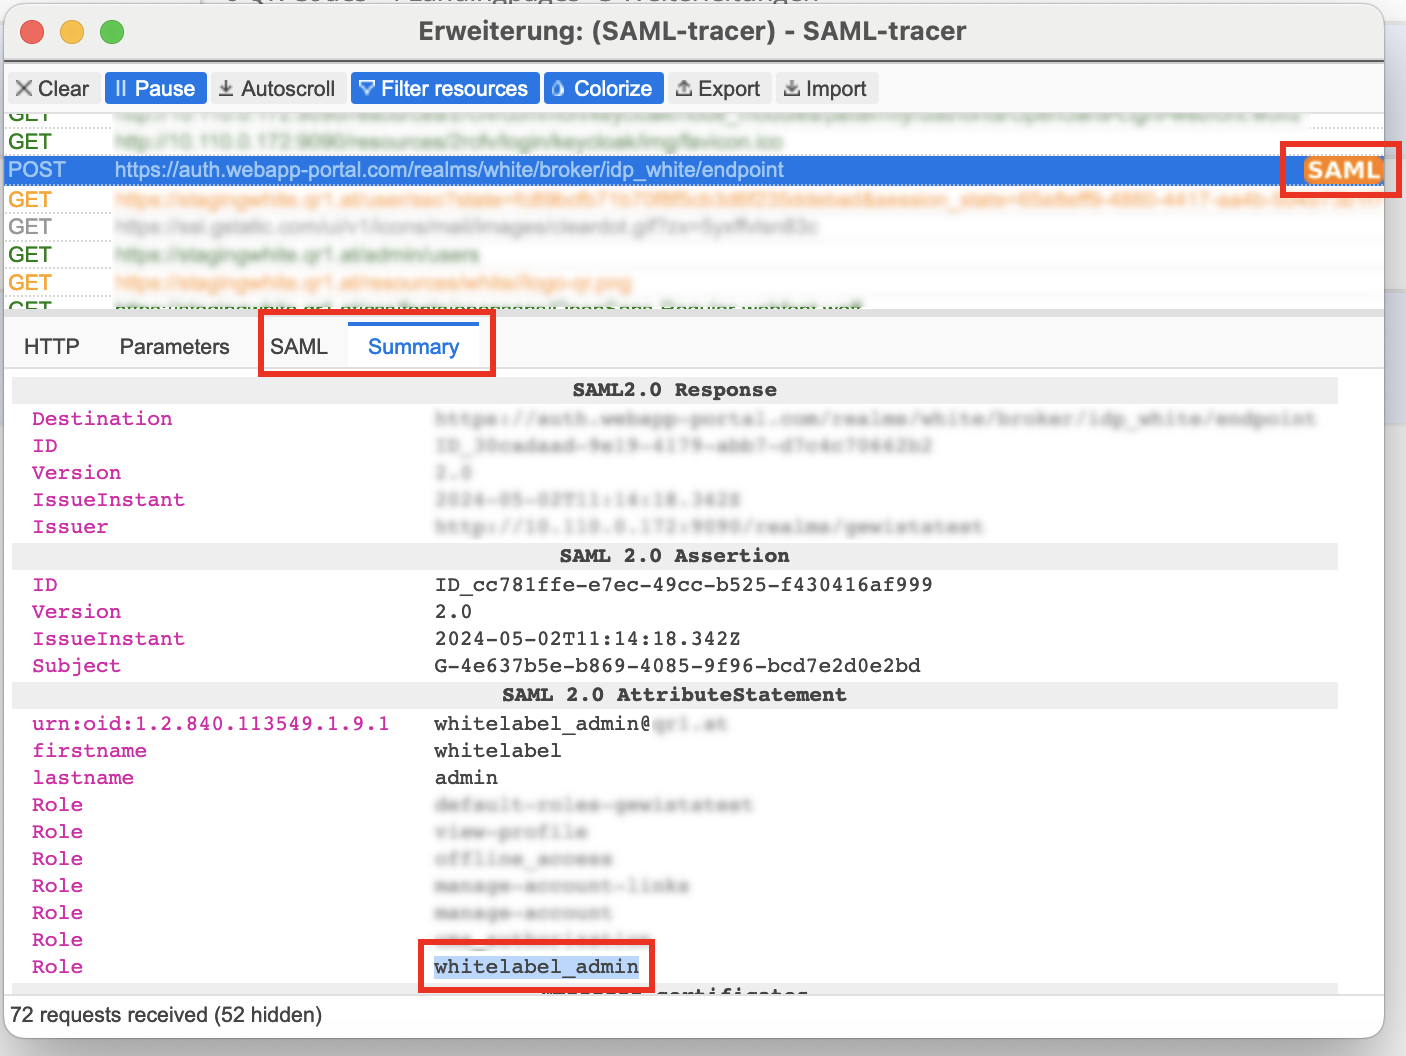
After you open the SAML-tracer popup...
- start with a SSO login process
- You will see the list at the top of the popup fill with HTTP requests.
- Click on the request that is marked as a SAML request in orange color.
- Choose the tab Summary (or SAML for all the details in XML format). You can check, if the data (eg. Role) is transferred correctly. In this case the role whitelabel_admin has been transferred. This is exactly what we need for this user to log in as a whitelabel portal admin.